Kitchen Cabinet Painting in Orleans Ontario Cost Effective Style Tips and Local Help

A full kitchen renovation can feel tempting when cabinets look tired, but in many Orleans homes, the cabinet boxes are still solid. The problem is usually the finish: worn edges, dated stain, yellowed clear coat, or a colour that no longer fits the rest of the room.
That is where cabinet painting earns its place. A careful paint job can change the whole feel of a kitchen without replacing perfectly usable cabinetry. It can brighten a compact space, make older doors look current, and help tie together new counters, flooring, lighting, or hardware.
For homeowners in Orleans, Ontario, the appeal is practical too. Painting often costs far less than cabinet replacement, creates less disruption, and keeps existing materials out of the landfill. The key is doing it properly, with the right paint, the right prep, and a realistic plan.

Why painting kitchen cabinets makes so much sense
Cabinets take up a large share of the visual space in a kitchen. Change their colour and the whole room changes with them. That is why cabinet painting can have such a strong effect, even when everything else stays in place.
The biggest benefit is cost-effectiveness. Replacing cabinets often involves demolition, new boxes, new doors, installation labour, possible plumbing adjustments, and sometimes new counters if the old ones cannot be removed cleanly. Painting works with what is already there. If the cabinet layout functions well and the boxes are sturdy, paint can deliver the visual refresh without the cost and mess of a full tear-out.
There is also less downtime. A careful DIY project will still take several days because cleaning, sanding, priming, painting, and curing all need time. A professional team may work faster, depending on the size of the kitchen and their process. Either way, painting usually causes less disruption than having the whole kitchen rebuilt.
Aesthetic flexibility is another major draw. Paint lets a kitchen move from dark and heavy to light and airy, or from builder-basic to custom-looking. In Orleans homes, where many kitchens serve busy family routines, open-concept layouts, and entertaining, a painted finish can help the room feel more connected to the rest of the main floor.
Popular cabinet colour directions include:
Warm white
Clean, bright, and easy to pair with many counters and backsplashes.
Soft greige
A practical middle ground between grey and beige, especially with warmer flooring.
Deep navy or green
Rich and eye-catching on islands, lower cabinets, or pantry walls.
Charcoal or soft black
Dramatic, but best balanced with good lighting and lighter surfaces.
Natural-inspired neutrals
Cream, mushroom, clay, and muted olive can feel softer than stark white.
Painting also gives hardware a second life. New knobs, pulls, or hinges can make painted doors look more finished. Even simple matte black, brushed brass, or satin nickel hardware can change the mood of the room.
Know when cabinets are good candidates for paint
Not every cabinet should be painted. Before buying primer and rollers, check the condition of the doors, drawer fronts, and boxes.
Cabinets are usually good candidates when they are structurally sound, close properly, and have surfaces that can be cleaned and sanded. Solid wood, MDF, and many previously finished cabinet doors can be painted with the right prep and bonding primer.
Be cautious if the cabinets have peeling laminate or thermofoil, swollen MDF, water damage under the sink, loose veneer, or badly warped doors. Paint will not fix those issues. It may hide them for a short time, but the problems often return.
Run through this quick inspection:
Check | What to look for | Why it matters |
Door condition | Cracks, warping, peeling veneer | Paint needs a stable surface |
Cabinet boxes | Loose joints, water stains, swelling | Damage may need repair first |
Finish | Glossy coating, grease, silicone residue | Prep must remove slick or oily layers |
Hardware | Worn hinges, stripped screw holes | Repairs are easier before painting |
Layout | Good storage and traffic flow | Painting is best when the layout already works |
If the layout frustrates daily cooking, painting may not solve the bigger problem. If the layout works but the finish looks dated, cabinet painting is often a smart choice.

Choose the right paint for a durable kitchen finish
Kitchen cabinets need a tougher finish than bedroom walls. Doors and drawers face steam, grease, fingerprints, cleaning products, and constant handling. A standard wall paint is usually not the best choice.
Look for paint labelled for cabinets, trim, doors, or furniture. These products dry harder and resist scuffs better than typical wall paint. Many homeowners use water-based alkyd, acrylic enamel, or urethane-reinforced cabinet paints because they combine durability with easier cleanup than traditional oil paint.
The best paint choice depends on the cabinet material, the desired sheen, and how the kitchen gets used. A busy family kitchen needs a finish that can handle frequent wiping. A lower-traffic secondary kitchen may not need the same level of durability.
Sheen also matters. Satin and semi-gloss are common for cabinets because they are easier to clean than flat finishes. Semi-gloss reflects more light and can show surface flaws more clearly. Satin tends to look softer and more forgiving.
When choosing colour, test before committing. Cabinet colours look different on vertical doors than they do on small paint chips. Light changes throughout the day, especially in kitchens with windows facing different directions. In an Orleans home with snowy winter light, a cool white may feel sharper than expected. In summer, the same colour may look brighter and warmer.
A smart testing method is simple:
Paint sample boards instead of painting directly on the cabinet.
Move them around the kitchen in morning, afternoon, and evening light.
Hold them beside counters, flooring, backsplash, and appliances.
Check the colour with lights on and off.
View the sample from across the room, not only up close.
Primer deserves the same care as paint. A bonding primer helps paint stick to slick surfaces. A stain-blocking primer can help with tannin bleed from certain woods. Some products combine these strengths, but not all do. Read the label and ask paint store staff if the primer suits your cabinet material.
Gather the tools before starting
Cabinet painting is not complicated in theory, but it rewards patience. Having the right tools nearby prevents messy shortcuts.
For a typical project, gather:
Degreasing cleaner
Microfibre cloths and sponges
Painter’s tape
Drop cloths or rosin paper
Screwdriver or drill
Zip-top bags for screws and hinges
Labels or masking tape for numbering doors
Wood filler for dents and old hardware holes
Sanding sponges or an orbital sander
Fine-grit sandpaper
Tack cloth or vacuum with brush attachment
High-quality angled brush
Small foam or microfibre rollers
Paint tray and liners
Bonding primer
Cabinet-grade paint
Painting pyramids, blocks, or drying racks
A sprayer can create a very smooth finish, but it brings extra setup. Overspray control, masking, ventilation, and technique all matter. Many DIYers get strong results with a quality brush and roller, especially on simple shaker or flat-panel doors.
Do not overlook safety and comfort. Open windows when weather allows, follow product instructions for ventilation, and wear eye protection when sanding. A respirator rated for the materials being used is a good idea during sanding and spraying.
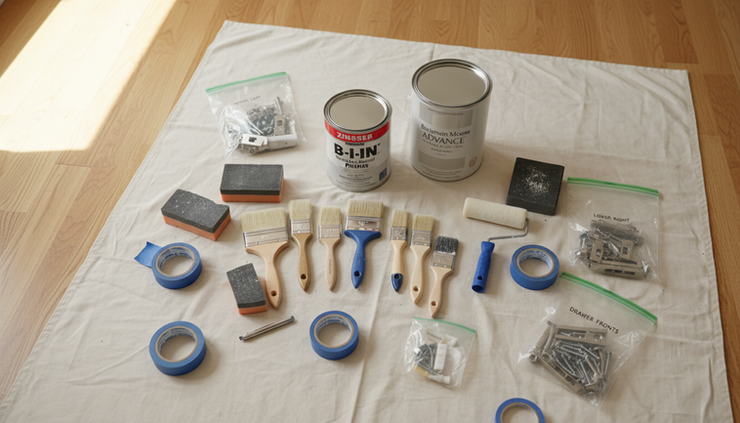
Prepare the cabinets like the finish depends on it
The final coat only looks as good as the prep beneath it. Most cabinet painting failures come from poor cleaning, skipped sanding, weak primer, or rushing the cure time.
Start by removing doors and drawer fronts. Label everything clearly. A small piece of tape inside each door and a matching mark on the cabinet box can save hours of confusion later. Keep screws, hinges, and pulls in labelled bags.
Next, clean every surface. Kitchen cabinets collect oils and residue, even when they look clean. Pay extra attention around handles, above the stove, near the sink, and on lower cabinets. Paint does not bond well to grease.
After cleaning, repair dents, cracks, and unwanted hardware holes. Let filler dry fully, then sand it smooth. If changing from knobs to pulls, measure carefully before filling or drilling. Small alignment errors become very visible once fresh paint and new hardware go on.
Sand the cabinet surfaces to dull the existing finish. This does not always mean sanding down to bare wood. The goal is usually to scuff the surface so primer can grip. Vacuum dust from corners and wipe with a tack cloth or clean damp cloth, depending on the product instructions.
Apply primer in thin, even coats. Thick coats can drip, stay soft, or show brush marks. Let primer dry as directed, then lightly sand if the surface feels rough. Remove dust again before painting.
When painting, thin coats win. Two or three light coats usually look better and cure stronger than one heavy coat. Watch for drips along door edges and inside profiles. Paint the backs of doors first, let them dry, then paint the fronts so the most visible side gets the cleanest finish.
Curing is different from drying. Paint may feel dry to the touch within hours, but it can take much longer to harden fully. During that period, be gentle with doors, drawers, and hardware. Avoid aggressive scrubbing until the finish has cured according to the paint label.
Decide whether to DIY or hire help in Orleans
A careful homeowner can paint cabinets well, but it is not a one-evening project. The work requires space, patience, and attention to detail. The decision often comes down to time, tolerance for disruption, and finish expectations.
DIY may be a good fit when:
The kitchen is small or medium-sized.
The cabinet doors are simple.
There is space to lay out doors for drying.
The existing finish is in decent shape.
A hand-painted or rolled finish is acceptable.
Hiring a professional may make more sense when:
The kitchen has many doors and drawers.
The cabinets are glossy, damaged, or tricky to prep.
A sprayed finish is preferred.
Time is limited.
The kitchen needs repairs, caulking, or colour consulting.
Orleans homeowners have several local options for support. Paint retailers in Orleans and east Ottawa can help match products to cabinet materials. Home improvement centres can supply tools, sanding materials, primers, and hardware. Local cabinet painters, furniture refinishers, and general painting contractors may offer cabinet-specific services.
When looking for professional help, ask focused questions:
Do they remove doors and drawer fronts?
Do they clean and degrease before sanding?
What primer and paint system do they use?
Do they spray, brush and roll, or use a combination?
Where do they paint the doors?
How do they protect floors, counters, appliances, and nearby rooms?
How long should the finish cure before normal use?
Can they show recent cabinet projects?
Reviews and before-and-after photos can help, but process matters more than polish. A good cabinet painter should explain prep in detail. If the answer is vague, keep asking.
It is also useful to check Ottawa-area community groups, neighbourhood recommendations, and local trade directories. Friends or neighbours in Fallingbrook, Chapel Hill, Avalon, Convent Glen, or nearby east-end communities may have recent experience with painters or refinishers. Personal referrals can reveal what the job was like day to day, not only how the photos looked at the end.
Add style with colour, hardware, and simple details
Paint is the main event, but the supporting details make the result feel complete.
Hardware is one of the easiest upgrades. If the existing handles are worn or dated, new pulls can sharpen the whole kitchen. Keep comfort in mind. A sleek handle that feels awkward every morning will get annoying fast.
Backsplashes, counters, and flooring should guide the cabinet colour. Cool grey counters often pair better with crisp whites, soft greys, or muted blues. Warm wood floors may suit cream, taupe, mushroom, or green. Busy granite can benefit from quieter cabinet colours that do not compete.
Two-tone kitchens can work well when used with restraint. Painting the island or lower cabinets a deeper colour gives contrast while keeping upper cabinets light. This can be especially useful in open layouts where the kitchen needs to connect with living and dining areas.
Small finishing touches also help:
Add soft-close hinges if the old hinges need replacing.
Use clear bumpers to protect painted doors.
Replace damaged toe kicks or side panels.
Caulk small gaps where appropriate before painting.
Update lighting so the new colour reads properly.
A painted kitchen does not need to chase trends. The best result fits the home, the light, and the way the room gets used.
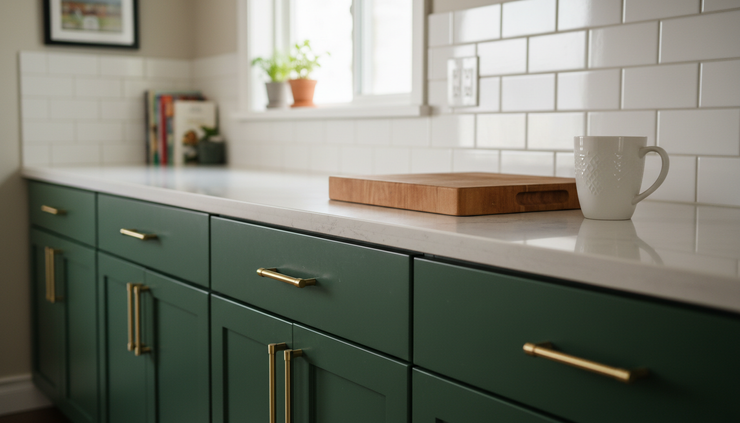
Share the transformation and learn from others
One of the most helpful parts of any cabinet painting project is seeing real before-and-after examples. A paint chip in a store can only say so much. Finished kitchens show how colours behave with floors, counters, lighting, and everyday objects.
If a cabinet painting project is already underway, take photos before removing the doors, during prep, after primer, and once everything is reinstalled. These images make it easier to compare the change, and they can help someone else planning a similar project in Orleans.
Before-and-after photos are also a good way to catch details. The camera may reveal a missed edge, uneven sheen, or hardware alignment issue that the eye skips over in person.
Kitchen cabinet painting in Orleans Ontario is a practical way to refresh a home without starting from scratch. With careful prep, cabinet-grade paint, and the right help when needed, tired cabinets can become one of the strongest features in the room.
If you have painted your cabinets, or hired a local professional to do it, share the experience. What colour did you choose? What would you do differently? Before-and-after photos, product lessons, and local tips can help the next Orleans homeowner start with more confidence.
Comments