How to Achieve Quality Cabinet Staining Near Me
- demoore5506
- Jan 3
- 8 min read

More than 60 percent of Ottawa households rank kitchen updates at the top of their home improvement priorities. When busy Canadian families seek a refreshed kitchen look, full renovations can feel overwhelming and costly. Cabinet refinishing offers a practical solution that delivers impressive American-inspired style without stressful disruptions. Discover how a few strategic steps can bring new life to your cabinets and elevate your kitchen’s appearance in no time.
Table of Contents
Quick Summary
Key Point | Explanation |
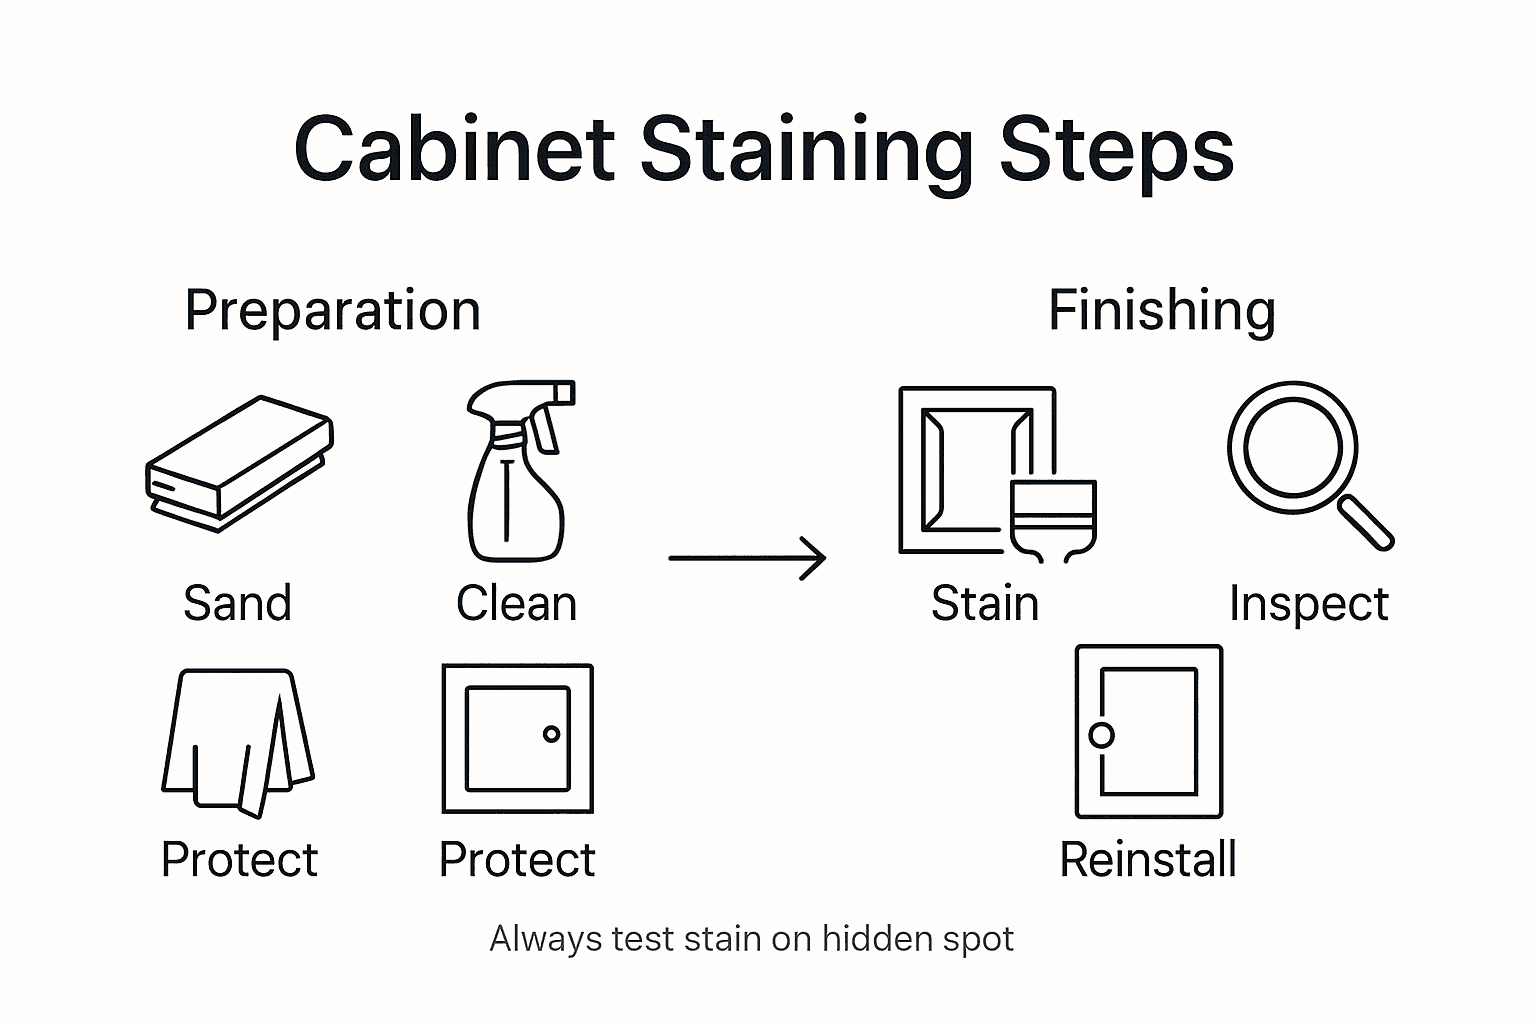
1. Thoroughly Sand Cabinets | Use increasingly finer sandpaper, starting with 80 grit, to create a smooth surface for staining. |
2. Choose Quality Stains | Select high-quality stains based on wood type for deep color penetration and durability. |
3. Apply Stain Evenly | Use a clean cloth or brush to apply stain in small sections, following the wood grain to avoid blotches. |
4. Inspect for Imperfections | Conduct a thorough visual check for color consistency and smooth texture before considering the project complete. |
5. Reinstall Hardware Carefully | Follow precise steps to reattach hardware without damaging the stained finish, ensuring clean and level installations. |
Step 1: Prepare Cabinets for Staining
Preparing your Ottawa kitchen cabinets for staining involves creating the perfect surface for maximum stain absorption and a professional finish. Your goal is to transform raw wood into a smooth canvas that will showcase the rich color and depth of your chosen wood stain.
The preparation process starts with thorough sanding to remove any existing finish and create an ideal texture. Proper wood surface preparation involves methodically working through different sandpaper grits to open the wood grain and eliminate imperfections. Begin with coarser grit sandpaper (around 80 grit) to remove old finishes or rough areas, then progressively move to finer grits like 120 and 220 to smooth the surface. When sanding, always follow the wood grain to prevent scratches that could disrupt the final stain appearance.
After sanding, your cabinets require careful cleaning to remove all dust and debris. Use a tack cloth or slightly damp microfiber cloth to wipe down the entire surface, ensuring no particles remain that could interfere with stain absorption. For woods with significant color variations, you might need to consider preliminary staining or light bleaching to achieve a more uniform appearance before applying your final wood stain.
Pro tip: Invest in high quality dust masks and work in a well ventilated area to protect yourself during the sanding process.
Step 2: Select Premium Stain and Materials
Selecting the right stain and materials is crucial for achieving a professional cabinet refinishing result that will transform your Ottawa kitchen’s appearance. Your goal is to choose high-quality products that will provide durability, rich color, and a smooth finish that enhances your wood cabinets.
High-quality wood stains require careful consideration of several key factors. The stain should contain a balanced combination of dye and pigment to ensure deep color penetration and rich visual depth. Consider the specific wood species of your cabinets when selecting a stain type some stains work better with fine-grained woods while others are ideal for more porous wood surfaces. Professional grade stains typically come in oil based or water based formulations each with unique advantages. Oil based stains tend to penetrate deeper and provide richer color saturation, while water based options offer easier cleanup and faster drying times.
When evaluating materials, prioritize products that meet professional standards for performance and safety. Look for stains with robust binders and pigments designed specifically for wood finishing. Pay attention to color samples and test patches to ensure the final result matches your vision. Consider factors like UV resistance, moisture protection, and long term durability when making your selection.
Here’s a quick comparison of oil-based and water-based stains:
Attribute | Oil-Based Stain | Water-Based Stain |
Color Depth | Rich, saturated tones | Lighter, consistent shades |
Drying Time | Slow (up to 24 hours) | Fast (2-6 hours) |
Cleanup Process | Requires solvents | Simple with soap and water |
Odor Level | Strong, lingering smell | Low, dissipates quickly |
Durability | Long-lasting finish | Good, but may need recoating sooner |
Environmental Impact | Contains more VOCs | Lower VOC, more eco-friendly |
Pro tip: Always purchase a few extra stain samples and test them on a hidden section of wood or a spare cabinet piece to confirm the exact color and finish before committing to the entire project.
Step 3: Apply Stain for a Smooth Finish
Applying stain to your Ottawa kitchen cabinets requires precision, patience, and the right technique to achieve a professional looking finish that showcases the natural beauty of your wood. This crucial step will transform your cabinets from worn to wonderfully renewed.
Wood finishing techniques demand careful attention to detail during application. Start by selecting a clean soft cloth or high quality bristle brush designed for wood staining. Work in small sections applying the stain evenly with smooth consistent strokes that follow the wood grain. The key is to distribute the stain uniformly without allowing excess product to pool or create uneven patches. After initial application, use a clean dry cloth to wipe away any surplus stain immediately this prevents blotching and ensures a more uniform color absorption.

Environmental conditions play a significant role in achieving a flawless finish. Work in a well ventilated area with consistent temperature around 70 degrees Fahrenheit. Allow sufficient drying time between coats typically 24 hours depending on the specific stain product. Light sanding with fine grit sandpaper between coats can help create an ultra smooth surface that looks professionally finished. Be sure to remove all sanding dust with a tack cloth before applying subsequent layers to maintain a pristine finish.
Pro tip: Test your staining technique and color on a hidden cabinet section or spare wood piece to preview the final result and perfect your application method before committing to the entire project.
Step 4: Inspect Results for Quality Assurance
After carefully staining your Ottawa kitchen cabinets, a thorough quality inspection ensures your hard work translates into a professional finish that meets the highest standards. This final review is your opportunity to catch and correct any subtle imperfections before declaring the project complete.
Quality assurance techniques require meticulous visual examination under different lighting conditions. Inspect each cabinet surface from multiple angles using natural daylight and interior lighting to reveal any potential inconsistencies. Look closely for uniform color distribution, checking that no blotches, runs, or uneven streaks compromise the overall appearance. Pay special attention to edges, corners, and areas around hardware where stain application can be more challenging. Run your hand gently across the surface to feel for smoothness and detect any rough patches that might require additional sanding or touch up.
Critical areas to examine include color consistency, surface texture, and overall finish quality. Verify that the stain color matches your original vision and looks even across all cabinet surfaces. Check for complete coverage without missed spots or thin areas. Test the finish durability by gently pressing your fingernail against an inconspicuous area to ensure proper adhesion and hardness. If you notice any minor imperfections, address them immediately using light sanding and targeted stain application to maintain a professional result.
Use this checklist to verify cabinet staining quality:
Inspection Area | What to Check | Ideal Outcome |
Color Evenness | Uniform color on all surfaces | No streaks or blotches |
Surface Texture | Smooth to the touch | No rough patches |
Hardware Area | No scratches or damage | Clean, flawless finish |
Finish Durability | Press test with fingernail | Hard, well-adhered surface |
Pro tip: Use bright LED lighting or position a strong flashlight at an angle to help reveal subtle surface irregularities that might be invisible under standard room lighting.
Step 5: Reinstall Hardware and Restore Space
The final stage of your Ottawa kitchen cabinet staining project involves carefully reinstalling hardware and returning your kitchen to its fully functional state. This step transforms your refreshed cabinets from a work in progress to a stunning completed renovation.
Cabinet hardware reinstallation techniques require precision and gentle handling to protect your newly stained surfaces. Begin by thoroughly cleaning each piece of hardware to remove any dust or residue from the staining process. Ensure the stain is completely cured before reattaching pulls, knobs, and hinges. Use clean microfiber cloths or soft padding to prevent scratching the new finish while working. Align each hardware piece carefully checking that screws are straight and tightened evenly without applying excessive pressure that could damage the delicate new stain.
As you restore your kitchen space, take time to organize and clean surrounding areas. Wipe down countertops and surrounding surfaces to remove any staining dust or debris. Position your newly refinished cabinets with care, ensuring they are level and properly aligned. Consider this an opportunity to reorganize your kitchen storage creating a fresh look that complements your beautifully stained cabinets. Double check that all drawers and doors open smoothly and that hardware sits flush against the newly stained surface.
Pro tip: Use a magnetic screwdriver bit to prevent dropping screws and protect your newly stained cabinet surfaces during hardware reinstallation.
Transform Your Ottawa Kitchen Cabinets with Expert Staining Services
Struggling to achieve a smooth and durable cabinet stain finish that truly revitalizes your kitchen can be frustrating. This article highlights critical challenges like proper surface preparation, stain selection, and flawless application to avoid blotches and uneven color. At Ottawa Cabinet Painting, we understand these pain points and your goal to elevate your cabinets without the high cost of replacement or chaotic renovation.
Our professional team uses meticulous prep work combined with premium products to deliver a silky smooth finish that lasts. We focus on precision techniques and controlled environments to ensure even color and durability, relieving you from the stress of trial and error. Ready to say goodbye to blotchy stains and welcome a warm, inviting kitchen centerpiece that reflects your style? Discover how our expert cabinet refinishing solutions can transform your space by visiting Ottawa Cabinet Painting. Explore the art of refined cabinet painting with us and take your kitchen from worn to wonderful today.
Frequently Asked Questions
How do I prepare my cabinets for quality staining?
To prepare your cabinets for quality staining, start by sanding the surfaces to remove any previous finishes and create a smooth texture. Remember to clean off any dust afterward to ensure even stain absorption.
What type of stain should I select for my cabinets?
Choose a high-quality wood stain based on your cabinet’s wood type, considering oil-based or water-based options for different properties. Test the stain on a hidden area to ensure it matches your desired color before applying it to the entire project.
How do I apply stain evenly on my cabinets?
To apply stain evenly, use a soft cloth or a quality brush, working in small sections and following the wood grain. After applying, wipe off any excess stain immediately to avoid blotching and ensure a uniform finish.
How can I inspect the quality of my stained cabinets?
Perform a meticulous inspection of your stained cabinets by checking for color consistency, smoothness of the surface, and overall finish. Use different lighting conditions to reveal any imperfections and make necessary touch-ups quickly.
What steps should I follow to reinstall hardware after staining?
After the stain has fully cured, clean each piece of hardware and carefully align them when reinstalling to avoid damaging the finish. Ensure screws are inserted straight and tightened evenly without over-tightening, which could harm the new stain.
Recommended
Comments