How to Fix Painted Cabinets: Easy Ottawa Kitchen Refresh 2025
- demoore5506
- Jul 30, 2025
- 9 min read
Updated: Aug 6, 2025

Fixing painted cabinets might look simple and satisfying, but the reality is a lot messier. Homeowners are shocked to learn that 90 percent of paint failures on cabinets come from poor preparation and cleaning. Most people put all their trust in fancy paint brands, not realizing it is the invisible dirt and old finishes hiding underneath that wreck everything. A few careful steps before you ever touch a brush can save you from frustration and a kitchen disaster.
Table of Contents
Quick Summary
Takeaway | Explanation |
Thorough cleaning is essential | Removing grime and old paint ensures proper paint adhesion for better results. |
Proper surface preparation prevents mistakes | Sanding and repairing imperfections create a smooth base for painting, avoiding future issues. |
Use high-quality materials | Specialized primer and paint improve durability and resistance, ensuring a longer-lasting finish. |
Avoid common painting mistakes | Errors like rushing coats or choosing incompatible materials can ruin your efforts and finishes. |
Implement regular maintenance | Cleaning gently and controlling the environment protects your cabinets and extends their life. |
Common Painted Cabinet Problems and Causes
Kitchen cabinet painting transforms spaces, but several common issues can derail your renovation dreams. Understanding these problems helps homeowners prevent costly mistakes and achieve a professional finish.
Surface Adhesion and Preparation Challenges
One of the most critical factors in successful cabinet painting is proper surface preparation. Research investigating coating defects reveals that paint wrinkles often emerge when applying subsequent layers without understanding solvent interactions. Inadequate cleaning and surface preparation lead to multiple problematic scenarios.
Homeowners frequently encounter paint adhesion issues stemming from insufficient surface treatment. Grease, dirt, and existing finishes create barriers that prevent new paint from bonding correctly. According to Brooks Painting experts, skipping thorough cleaning and sanding can result in premature paint failure, especially around high-use areas like sink cabinets and handles.
Key preparation challenges include:
Residual Grease: Kitchen cabinets accumulate cooking oils and grime
Existing Finish Interference: Previous paint or varnish layers blocking new paint adhesion
Surface Irregularities: Rough or uneven surfaces preventing smooth application
Material-Specific Painting Complications
Different cabinet materials present unique painting challenges that can compromise your refresh project. Homes & Gardens research specifically warns about vinyl surfaces, which notoriously resist paint adhesion. Vinyl cabinets are particularly problematic, often resulting in immediate chipping and peeling after painting attempts.
Wood cabinets introduce their own set of complexities. Variations in wood grain, previous staining, and humidity levels can significantly impact paint performance. Soft woods like pine might absorb paint differently compared to hardwoods, creating uneven finishes. Maple cabinets, for instance, require specialized primer treatments to ensure proper paint retention.
Environmental and Application Factors
Beyond material challenges, environmental conditions dramatically influence painting outcomes. Temperature and humidity play crucial roles in paint curing and durability. Painting during high humidity can cause slower drying times, potentially leading to dust accumulation and uneven surfaces. Extreme temperatures likewise compromise paint quality, causing premature cracking or bubbling.
Application technique matters immensely. Uneven brush strokes, improper roller usage, and inconsistent paint layer thickness contribute to visible imperfections. Professionals recommend using high-quality brushes, maintaining consistent stroke directions, and allowing adequate drying time between coats.
For homeowners seeking a flawless cabinet transformation, understanding these potential pitfalls is crucial. Check out our comprehensive guide on prepping cabinets to ensure your kitchen refresh succeeds where many DIY attempts falter.
To help readers quickly compare cabinet material challenges, here’s a table summarizing the unique issues with vinyl vs. wood cabinets discussed above:
Cabinet Material | Challenges | Special Requirements |
Vinyl | Poor paint adhesion, chipping, peeling | Use surface-bonding primer; avoid painting if possible |
Wood (Pine) | Uneven paint absorption, grain variation | Use grain filler, quality primer |
Wood (Maple) | Difficulty in paint retention, smooth surface | Specialized primer for maple |
Step-by-Step Guide to Fixing Painted Cabinets
Restoring painted cabinets requires careful preparation and systematic execution. Homeowners can transform their kitchen appearance by following a structured approach that addresses paint imperfections and creates a professional finish.
Comprehensive Surface Preparation
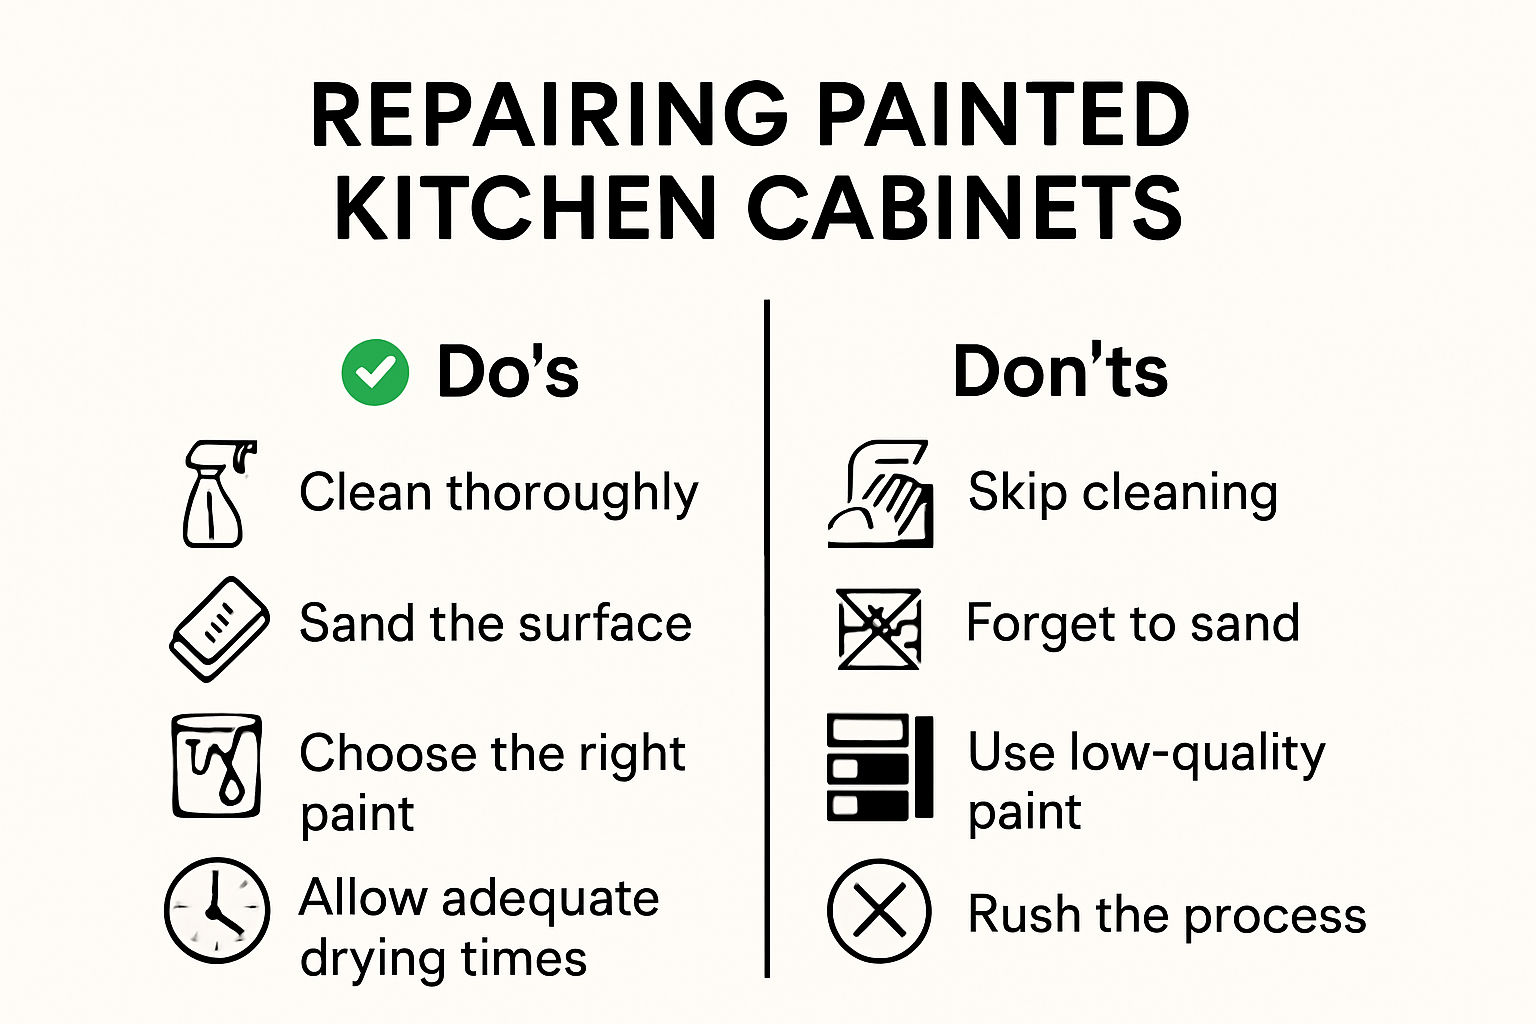
Before attempting any paint repair, thorough surface preparation is crucial. This Old House experts recommend a meticulous cleaning process that removes years of accumulated grime, grease, and old paint residue. Start by removing cabinet doors and hardware, then clean surfaces using a degreasing solution specifically designed for kitchen surfaces.
Key preparation steps include:
Detailed Cleaning: Use a strong degreaser to eliminate kitchen oils and dirt
Sanding: Lightly sand existing painted surfaces to create a smooth, receptive base
Repair Work: Fill any holes, dents, or imperfections with wood filler or appropriate repair compound
Professional painters emphasize the importance of creating a uniform surface. Uneven areas will become more pronounced after repainting, so take time to smooth out any irregularities.
Strategic Painting and Repair Techniques
Bob Vila’s comprehensive guide highlights critical techniques for achieving a flawless cabinet finish. Choose high-quality primer and paint designed specifically for kitchen cabinetry. These specialized products offer better adhesion, durability, and resistance to moisture and temperature changes.
When addressing specific paint problems, different approaches are necessary:
For minor chips and scratches: Use wood filler, sand smooth, and touch up with matching paint
For peeling paint: Remove loose paint completely, sand edges, prime, and repaint entire surface
For uneven finishes: Sand entire surface, apply primer, and use high-quality roller or sprayer for consistent coverage
Final Finishing and Protection
HGTV painting experts recommend multiple thin coats over a single thick application. Allow adequate drying time between coats, typically 24 hours, to ensure proper adhesion and prevent future complications.
Protective measures extend the life of your cabinet paint:
Apply a clear topcoat for added durability
Use painter’s tape to create clean, professional edges
Allow cabinets to cure completely before heavy use
For homeowners seeking a more comprehensive approach, explore our detailed guide on cabinet painting preparation to ensure a successful kitchen transformation.
Remember that patience and attention to detail are your greatest assets when fixing painted cabinets. Each careful step brings you closer to a professional-looking kitchen refresh that can dramatically improve your home’s aesthetic and value.
Here’s a table summarizing the key steps in fixing painted cabinets for easy reference:
Step | Action | Purpose |
Remove hardware/doors | Take off handles, hinges, doors | Access all surfaces |
Clean surfaces | Use degreaser to remove oils and grime | Ensure paint adhesion |
Sand surfaces | Lightly sand to even and roughen area | Promote paint bonding |
Repair damage | Fill dents, holes with filler | Achieve smooth finish |
Prime (if needed) | Apply proper primer | Enhance durability |
Paint coats | Use thin coats, quality brush/roller | Smooth, lasting coverage |
Apply topcoat (optional) | Add clear finish for protection | Extra durability |
Allow to cure | Wait before heavy use | Prevent damage |
Mistakes to Avoid When Repairing Cabinets
Repairs to painted kitchen cabinets can quickly turn disastrous without proper knowledge and technique. Understanding common pitfalls helps homeowners prevent costly mistakes and achieve professional-looking results.
Preparation and Cleaning Errors
Painting professionals emphasize that skipping crucial preparation steps can completely undermine your cabinet repair project. Inadequate cleaning and surface preparation lead to poor paint adhesion and unsatisfactory finishes.
Common preparation mistakes include:
Neglecting Thorough Cleaning: Failing to remove grease, dirt, and old residue
Skipping Sanding: Not creating a smooth surface for paint application
Ignoring Surface Imperfections: Painting over existing damages without proper repair
Ukie Painting experts warn against using harsh cleaning products that can strip existing finishes. Ammonia-based cleaners and abrasive solutions damage painted surfaces, causing premature fading and discoloration. Instead, use mild cleaners specifically designed for painted surfaces.
Paint Application and Technique Mistakes
Improper painting techniques can transform a potential kitchen upgrade into a frustrating renovation nightmare. Painting specialists highlight critical errors that compromise paint quality and durability.
Major painting mistakes to avoid:
Rushing Between Coats: Not allowing adequate drying time
Inconsistent Application: Using incorrect rollers or brushes
Overloading Paint: Applying thick, uneven layers
Ignoring Environmental Conditions: Painting in humid or extremely cold environments
Professional painters recommend using high-quality brushes, maintaining consistent stroke directions, and allowing 24 hours between paint coats. Temperature and humidity significantly impact paint performance, so choose optimal conditions for your project.
Material and Color Selection Pitfalls
Choosing the wrong paint or color can sabotage your entire cabinet repair effort. Not all paints are created equal, especially for kitchen environments that demand durability and resistance to moisture and temperature changes.
Critical considerations include:
Paint Compatibility: Select paints specifically formulated for kitchen cabinets
Color Matching: Test paint samples in your kitchen’s lighting
Finish Selection: Choose between matte, satin, and glossy finishes wisely
Learn more about comprehensive cabinet refinishing techniques to ensure your kitchen transformation meets professional standards.
Successful cabinet repairs require patience, attention to detail, and a willingness to invest time in proper preparation. By understanding and avoiding these common mistakes, homeowners can achieve stunning results that revitalize their kitchen’s appearance and extend the life of their existing cabinetry.
Maintaining Cabinets After Repairs
After investing time and effort into repairing your kitchen cabinets, proper maintenance becomes crucial to preserving their fresh appearance and extending their longevity. The right care strategy can protect your newly refinished surfaces and keep them looking pristine for years.
Cleaning and Daily Care Techniques
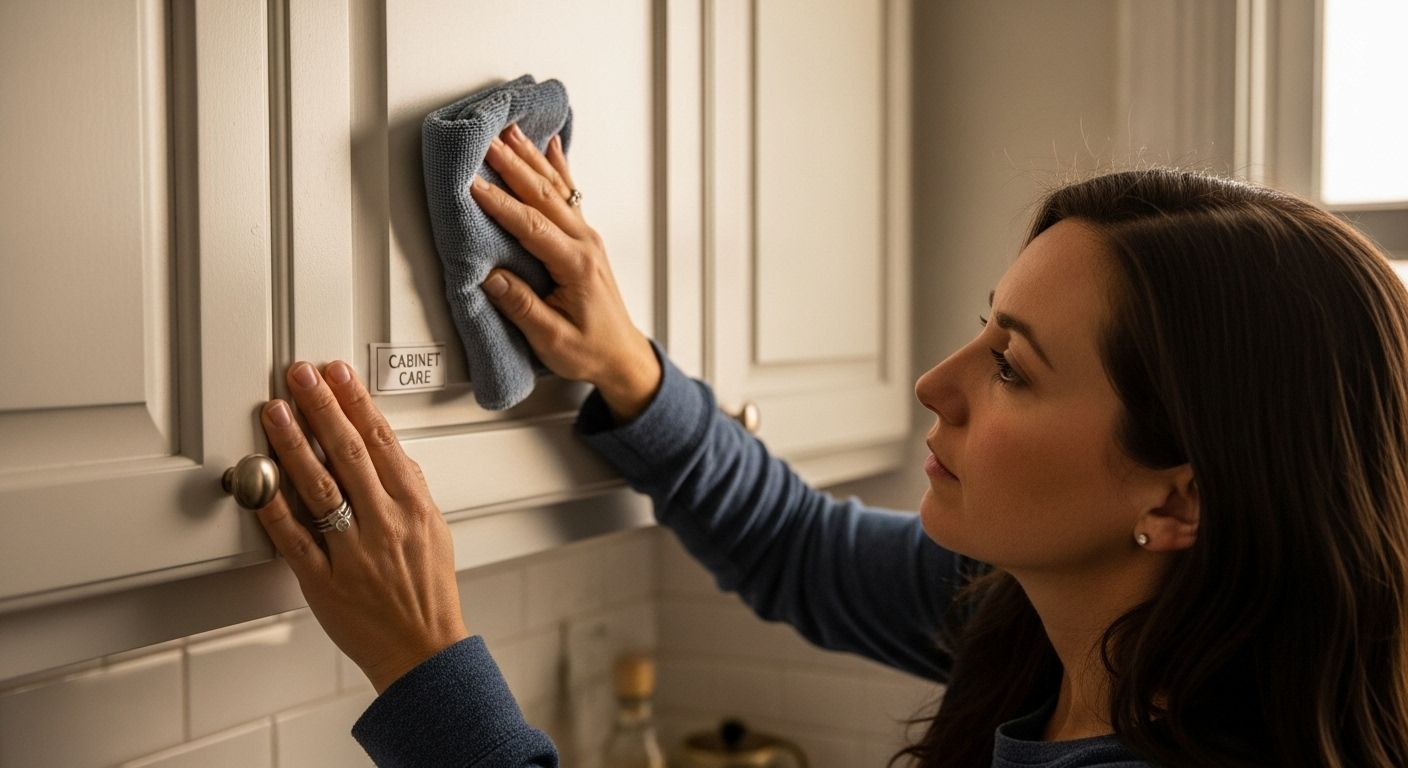
Kitchen Tune-Up experts recommend a delicate approach to cleaning newly painted cabinets. Immediate post-repair care is critical in maintaining the paint’s durability and finish.
Essential cleaning practices include:
Soft Cloth Cleaning: Use microfiber cloths to prevent scratching
Immediate Spill Management: Wipe spills promptly to prevent staining
Gentle Cleaning Solutions: Use mild, non-abrasive cleaners specifically designed for painted surfaces
DL Drury maintenance specialists emphasize the importance of avoiding harsh chemicals. Abrasive cleaners can quickly strip away the new paint finish, destroying your careful restoration work. Instead, opt for pH-neutral cleaning solutions that protect the cabinet’s surface.
Environmental Protection Strategies
Van Arbour Design professionals highlight the significant impact of environmental conditions on cabinet maintenance. Temperature fluctuations and moisture can dramatically affect painted surfaces.
Key environmental protection strategies:
Humidity Control: Maintain consistent indoor humidity levels
Temperature Management: Avoid extreme temperature changes
Ventilation: Ensure proper kitchen ventilation to prevent moisture buildup
Protective Accessories: Use shelf liners and protective covers in high-wear areas
Consider installing soft-close hinges and using door stoppers to minimize impact damage. These small investments can significantly extend the life of your newly repaired cabinets.
Long-Term Preservation Techniques
Beyond immediate care, long-term maintenance requires a proactive approach. Regular inspections can help you catch and address potential issues before they become significant problems.
Long-term preservation tips:
Periodic Touch-Ups: Keep matching paint for small repairs
Hardware Maintenance: Tighten handles and knobs regularly
Annual Deep Cleaning: Perform comprehensive cleaning once a year
Protective Coatings: Consider applying a clear protective sealant
Explore our comprehensive guide on cabinet refinishing to ensure you’re using the most effective maintenance techniques for your specific cabinet type.
Remember that consistent, gentle care is the key to maintaining your cabinets’ beauty. By implementing these strategies, you’ll protect your investment and keep your kitchen looking fresh and professionally maintained for years to come.
Frequently Asked Questions
What are the common problems when painting cabinets?
Common problems include poor paint adhesion due to inadequate cleaning and surface preparation, issues stemming from different cabinet materials, and environmental factors like humidity and temperature affecting paint quality.
How do I properly prepare my cabinets for painting?
To properly prepare your cabinets, clean surfaces thoroughly with a degreaser, sand existing painted surfaces lightly, and repair any imperfections using wood filler. Removing doors and hardware can also help.
What mistakes should I avoid when fixing painted cabinets?
Avoid skipping cleaning and sanding steps, rushing between paint coats, using thick layers of paint, and choosing incompatible paint types or colors. Each of these can lead to poor results and painted finishes that don’t last.
How can I maintain my painted cabinets after repairs?
Maintain your painted cabinets by using gentle, non-abrasive cleaners, managing humidity and temperature levels, conducting regular inspections, and performing periodic touch-ups as needed to preserve their appearance.
Tired of Cabinet Paint Fails? Get Lasting Results Without the Kitchen Chaos
Fixing painted cabinets on your own can be exhausting. The article shows just how easy it is to run into problems like chipping, peeling, and poor adhesion from missed prep work. When patch jobs, harsh cleaners, or rushed coats do not stick, it is not just your cabinets that suffer. Your entire kitchen loses its fresh look. Maybe you want a smooth, durable finish that actually holds up to daily use. Maybe you are worried about old paint layers causing new damage. Or you just cannot imagine living with construction mess for weeks. Whatever your worry, you deserve cabinets that look as good as new—without endless DIY struggles or the hefty price tag of a full remodel.
Why risk another DIY setback or live with paint that will not last? At Ottawa Cabinet Painting, our experts handle every detail—from in-depth surface prep to flawless finishing. We specialize in transforming existing cabinetry with professional-grade products and techniques that outlast any quick fix. With a typical project timeline of about ten days and a 6-year warranty, you can skip the stress and keep your kitchen the heart of your home. See how our cabinet refinishing solutions can save you time, money, and frustration. Ready to refresh your cabinets for good? Request your quote today and enjoy confidence in every brushstroke.
Recommended

For anyone in Ottawa looking for a hassle-free kitchen update, Ps Home Maintenance https://www.pshomemaintenance.com/ offers professional services to fix and refresh your cabinets efficiently. Their team ensures a smooth, long-lasting finish, saving you time and effort while giving your kitchen a modern look.