Painting Cabinets Without Sanding: Easy DIY Kitchen Update on Ottawa 2025
- demoore5506
- Aug 3, 2025
- 10 min read
Updated: Aug 6, 2025

Painting cabinets usually means hours covered in dust, sweat, and nonstop sanding. Sounds like a nightmare, right? Over 70 percent of homeowners now skip sanding altogether and still get crisp, smooth finishes that look brand new. The real surprise is how today’s no-sand methods can make the whole process faster, cheaper, and way cleaner than the old-school routine. You might not believe how easy a kitchen upgrade can be now.
Table of Contents
Quick Summary
Takeaway | Explanation |
Prepare surfaces carefully before painting | Thorough cleaning and using a deglosser ensure good paint adhesion without sanding. |
Choose high-quality bonding primers and paint | Using cabinet-specific products promotes better adhesion and durability for lasting finishes. |
Apply paint in thin, even coats | Multiple light coats help achieve a smooth, professional look while preventing drips and uneven texture. |
Maintain freshly painted cabinets consistently | Regular gentle cleaning protects the finish and extends the life of the paint job. |
Keep a touch-up kit for repairs | Having matching paint on hand allows for quick fixes of chips or scratches to maintain appearance. |
Why Skip Sanding When Painting Cabinets
Traditional cabinet painting often involves hours of laborious sanding, creating dust clouds and consuming precious time. What if you could achieve professional results without the backbreaking work? Painting cabinets without sanding offers homeowners a streamlined, efficient alternative that can transform kitchen spaces with minimal disruption.
The Modern Approach to Surface Preparation
Skipping traditional sanding doesn’t mean compromising paint quality. Our comprehensive guide on cabinet preparation reveals that modern paint technologies have revolutionized surface treatment. According to This Old House, cabinets with smooth, nonglossy surfaces can be effectively painted without extensive sanding when using the right techniques.
The key lies in proper surface preparation. Instead of generating mountains of sawdust, professional painters now use specialized deglossers and bonding primers that create an ideal paint adhesion surface. The Washington Post recommends testing a small area with a high-quality bonding primer to ensure proper paint adhesion without traditional sanding.
Benefits of Skipping Traditional Sanding
Choosing to paint cabinets without sanding offers multiple advantages for busy homeowners. First, you eliminate the messy, time-consuming process of generating dust that infiltrates every corner of your kitchen. Traditional sanding can take hours, sometimes days, whereas alternative methods can reduce preparation time significantly.
Second, skipping sanding minimizes potential damage to cabinet surfaces. Aggressive sanding can inadvertently create uneven textures, remove delicate wood details, or compromise the structural integrity of older cabinets. HGTV advises that if existing paint is sound and well-adhered, there’s no need to remove all of it. Instead, focus on creating a clean, slightly roughened surface for optimal paint adhesion.
Economically, the no-sand approach translates to fewer supplies, reduced labor time, and lower overall project costs. You’ll save money on sandpaper, dust masks, protective equipment, and potentially professional preparation services. The process becomes more accessible for DIY enthusiasts and homeowners looking to refresh their kitchen without extensive renovation.
While skipping sanding sounds appealing, success depends on selecting the right products and following precise preparation techniques. High-quality bonding primers, thorough cleaning, and careful application remain critical. Homeowners should still clean surfaces meticulously, remove hardware, and ensure a grease-free environment before painting.
Ultimately, painting cabinets without sanding represents a modern, efficient approach to kitchen updates. By leveraging advanced paint technologies and preparation methods, you can achieve professional-looking results with significantly less effort and mess.
Below is a summary table that compares traditional sanding cabinet painting with the no-sanding method as described above. This helps clarify the differences and benefits for readers considering each approach.
Feature | Traditional Sanding Method | No-Sanding Method |
Preparation Time | Hours to days | Much faster, significantly reduced |
Mess/Dust | High | Low |
Surface Damage Risk | Possible (uneven textures, detail loss) | Minimal |
Supplies Needed | Sandpaper, dust masks, more tools | Deglosser, bonding primer, fewer items |
Cost | Higher (more supplies, more effort) | Lower (less equipment, less labor) |
Skill Level | Moderate to advanced | Beginner to moderate |
Finish Quality | High with proper technique | High with proper technique |
Essential Tools and Supplies for No-Sanding Methods
Transforming kitchen cabinets without traditional sanding requires a strategic approach and specific tools. Painting cabinets without sanding demands precision, quality materials, and the right equipment to achieve professional results. Understanding the essential tools and supplies will set you up for a successful kitchen makeover.
Preparatory Tools for Surface Treatment
Before diving into painting, gathering the correct preparatory tools is crucial. Our detailed cabinet painting guide recommends a comprehensive toolkit. According to This Old House, key tools include a 2 1/2-inch angled brush, bonding primer specifically designed for cabinets, and a deglosser or liquid sandpaper.
Additional essential preparatory items include:
Cleaning Supplies: Degreasing solution, microfiber cloths, and disposable shop towels
Surface Protection: High-quality painter’s tape, drop cloths
Safety Equipment: Rubber gloves, safety glasses, respirator mask
Painting Application Tools and Materials
Popular Mechanics highlights the importance of selecting professional-grade application tools. Recommended items include flock rollers for smooth application, fine finish paint brushes like Purdy Nylox, and latex wood filler for addressing minor surface imperfections.
Paint selection is equally critical. Opt for high-quality cabinet paint with a satin or semi-gloss finish that provides durability and easy cleaning. The Home Depot emphasizes the importance of choosing paints specifically formulated for cabinet surfaces, which offer better adhesion and longevity.
Key painting materials include:
Paint Selection: Cabinet-specific latex or enamel paint
Application Tools: Small 4-6 inch rollers, high-quality angled brushes
Finishing Supplies: Paint trays, foam rollers for ultra-smooth finish
Preparing your workspace is as important as selecting the right tools. Cover countertops, floors, and adjacent surfaces with drop cloths. Remove cabinet hardware and label each piece to ensure accurate reinstallation. Create a clean, dust-free environment to prevent imperfections in the final finish.
Budget-conscious homeowners can find most of these tools at local hardware stores or home improvement centers. While investing in quality tools might seem expensive initially, they significantly reduce the likelihood of mistakes and ensure a professional-looking result.
Remember that technique matters as much as tools. Take time to practice application methods, use thin, even coats, and allow adequate drying time between applications. Patience and the right supplies will transform your kitchen cabinets without the tedious sanding process.
Below is a handy checklist table summarizing the essential supplies and tools for painting cabinets without sanding, helping you ensure you have everything ready before you start.
Tool/Supply | Purpose/Use | Essential (Yes/No) |
Degreasing solution | Clean surfaces pre-painting | Yes |
Microfiber cloths | Wipe and dry surfaces | Yes |
Disposable shop towels | Surface cleaning | Yes |
Liquid deglosser | Replace sanding, dull glossy finishes | Yes |
Bonding primer | Promote paint adhesion | Yes |
High-quality cabinet paint | Durable, professional finish | Yes |
2.5-inch angled brush | Precision painting on cabinets | Yes |
Flock or foam rollers | Smooth, streak-free application | Yes |
Latex wood filler | Fill minor imperfections | No |
Painter’s tape | Protect non-painted areas | Yes |
Drop cloths | Protect floors and counters | Yes |
Rubber gloves | Hand protection during prep/painting | Yes |
Safety glasses | Eye safety | Yes |
Respirator mask | Fume/dust protection | No |
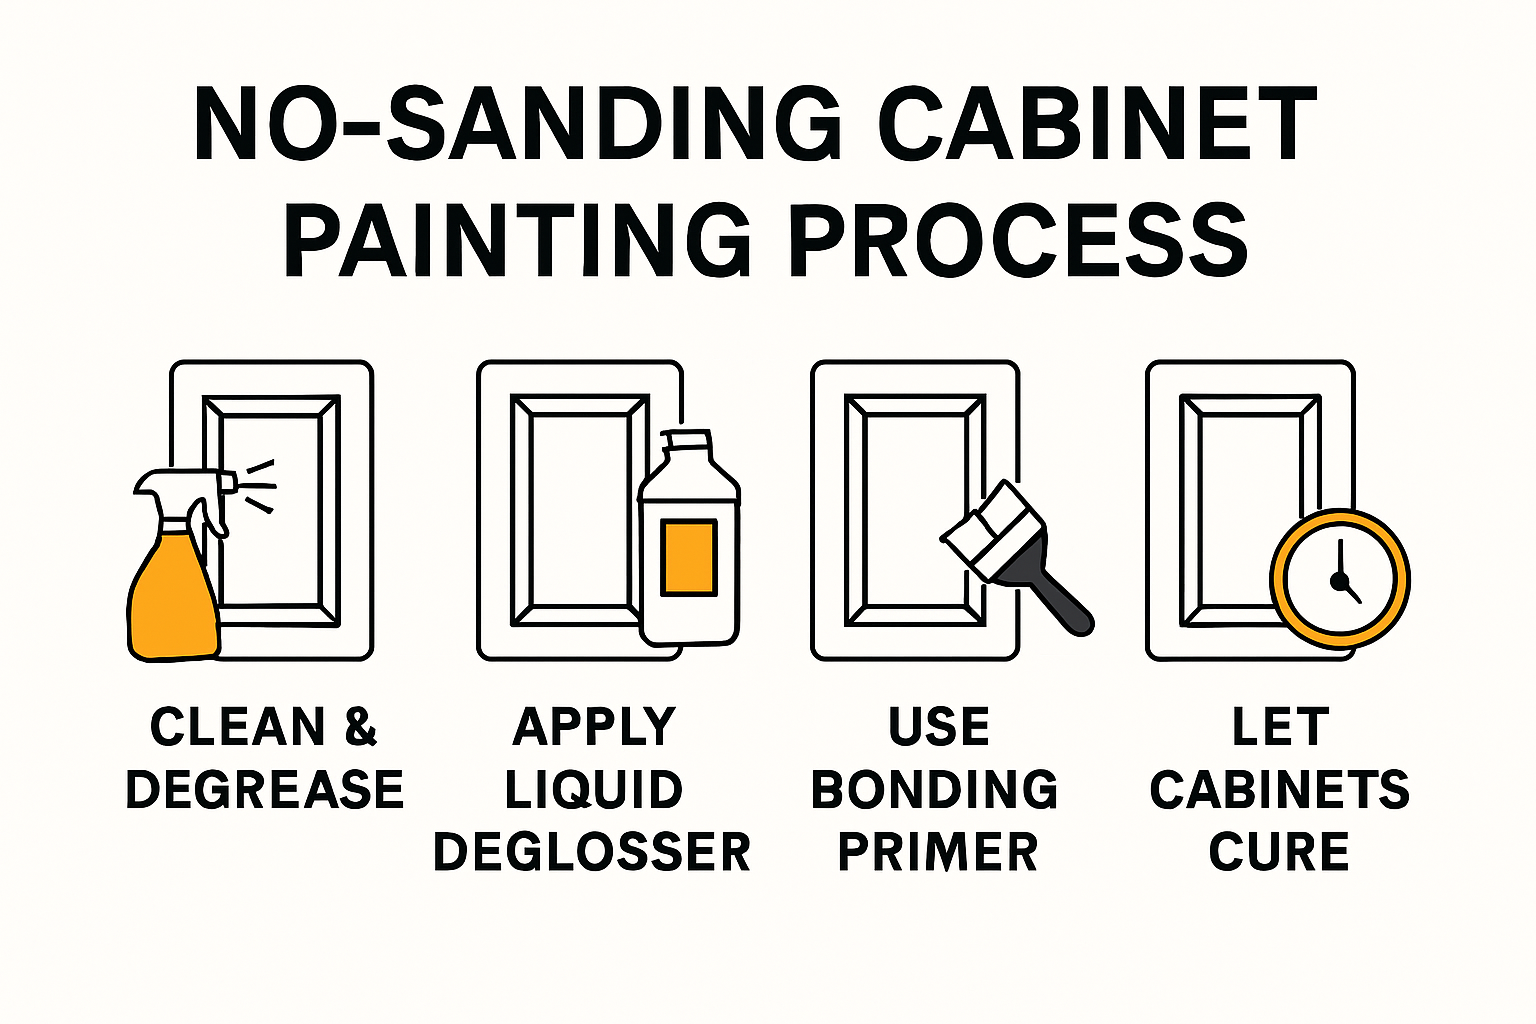
Step-by-Step Guide to Painting Cabinets Without Sanding
Painting cabinets without sanding transforms your kitchen with minimal effort and maximum impact. This comprehensive guide walks you through a professional-grade process that eliminates traditional sanding while ensuring a stunning, durable finish.
Preparation and Surface Cleaning
Explore our detailed cabinet preparation strategies before starting your project. According to This Old House, the first critical step is thorough cleaning. Remove all cabinet hardware and clean surfaces meticulously using a degreasing solution. Scrub away years of cooking residue, grease, and grime that can prevent paint adhesion.
Prepare your workspace by covering countertops and floors with drop cloths. Ensure proper ventilation and wear protective gear like safety glasses and rubber gloves. Use a lint-free cloth to wipe surfaces with a liquid deglosser, which helps create a paint-ready surface without traditional sanding.
Priming and Painting Techniques
The Washington Post recommends using a high-quality bonding primer specifically designed for glossy surfaces. Apply the primer using a foam roller or high-quality brush, working in thin, even strokes. This critical layer ensures paint adhesion and provides a smooth base for your final color.
When selecting paint, Architectural Digest suggests choosing a cabinet-specific paint with a satin or semi-gloss finish. These finishes offer durability and easy cleaning. Apply paint in multiple thin coats, allowing adequate drying time between applications. Use a foam roller for large surfaces and an angled brush for edges and detailed areas.
Key painting tips include:
Application Method: Use long, smooth strokes
Coat Thickness: Apply 2-3 thin coats
Drying Time: Allow 4-6 hours between coats
Pay special attention to potential problem areas like corners, edges, and intricate details. Maintain a consistent direction with your brush or roller to achieve a professional, uniform finish. Be patient and avoid overloading your brush or roller, which can cause drips and uneven coverage.
After the final coat has dried completely, carefully reattach cabinet hardware. Allow the painted surfaces to cure for several days before heavy use. This curing period ensures maximum durability and a resilient finish that can withstand daily kitchen activities.
While the process might seem intimidating, patience and attention to detail are your greatest allies. By following these steps, you can achieve a professional-looking cabinet transformation without the mess and effort of traditional sanding. Remember, preparation is key to a flawless finish that will revitalize your kitchen’s appearance.
For your convenience, here’s a process table summarizing the main steps to follow for painting cabinets without sanding, so you can keep track at each stage of your DIY project.
Step | Description | Key Tips |
1. Remove hardware | Take off doors, drawers, handles, and hinges | Label hardware for easy reassembly |
2. Clean surfaces | Use degreaser to remove all grease and residue | Focus on corners/edges |
3. Protect workspace | Cover counters, floors, and nearby surfaces | Use drop cloths & painter’s tape |
4. Apply liquid deglosser | Wipe surfaces to dull finish and aid in adhesion | Wear gloves, ventilate room |
5. Prime cabinets | Coat with bonding primer designed for cabinets | Thin, even coats; use foam roller/brush |
6. Paint cabinets | Use cabinet paint in light, even coats | Allow 4-6 hrs drying between coats |
7. Reattach hardware | After final coat is fully dry, reinstall hardware | Wait several days for paint to fully cure |
Expert Tips for Long-Lasting Painted Cabinets
Achieving a durable, professional-looking cabinet paint job requires more than just applying color. Painting cabinets without sanding is only the beginning of creating a finish that will withstand years of kitchen use. Professional painters and home improvement experts offer crucial insights to ensure your cabinet transformation remains pristine.
Selecting the Right Protective Finishes
Learn how to maintain your newly painted cabinets with expert preservation techniques. According to Bob Vila, selecting the appropriate primer-sealer is critical for long-term durability. A high-quality primer creates a protective barrier that prevents paint from peeling and ensures robust adhesion to the cabinet surface.
HGTV recommends water-based finishes for their exceptional durability and ease of cleaning. These modern formulations offer superior resistance to moisture, grease, and daily kitchen wear. Choose paints specifically designed for cabinetry, which provide enhanced protection against scratches, stains, and frequent cleaning.
Maintenance and Care Strategies
Proper maintenance extends the life of your painted cabinets. This Old House emphasizes the importance of gentle, consistent cleaning. Use soft microfiber cloths and mild, non-abrasive cleaners to remove dirt and grease without damaging the paint finish.
Key maintenance tips include:
Cleaning Frequency: Wipe down cabinets weekly
Cleaning Technique: Use soft cloths and gentle, pH-neutral cleaners
Avoid Harsh Chemicals: Skip abrasive cleaners and scrubbing pads
Protect your painted cabinets from environmental factors that can cause premature wear. Minimize exposure to direct sunlight, which can fade colors, and maintain consistent humidity levels in your kitchen. Install cabinet door bumpers to prevent hardware from chipping the paint during frequent use.
Professional Touch-Up Techniques
Even with meticulous care, cabinets may occasionally require touch-ups. Keep a small amount of your original paint for future repairs. When addressing minor chips or scratches, clean the area thoroughly, lightly sand the damaged spot, and apply a thin layer of matching paint.
Professional painters recommend:
Touch-Up Kit: Maintain a small repair kit with matching paint
Immediate Attention: Address scratches and chips promptly
Careful Application: Use thin, even coats for seamless repairs
Consider applying a clear topcoat for additional protection, especially in high-traffic areas or homes with children and pets. This extra layer provides additional durability and makes future cleaning and maintenance easier.
Remember that patience and consistent care are your best tools for maintaining a beautiful cabinet finish. By following these expert tips, you can ensure your painting cabinets without sanding project remains fresh and vibrant for years to come. Invest time in proper application and maintenance, and your kitchen will continue to look professionally updated and stunning.

Frequently Asked Questions
What are the benefits of painting cabinets without sanding?
Painting cabinets without sanding saves time, reduces mess, and minimizes potential damage to the cabinet surfaces. This method utilizes modern bonding primers and deglossers to ensure proper adhesion without the laborious process of sanding.
What tools do I need to paint cabinets without sanding?
Essential tools include a degreasing solution, microfiber cloths, a liquid deglosser, a high-quality bonding primer, cabinet-specific paint, angled brushes, and foam rollers. Proper surface protection materials like painter’s tape and drop cloths are also important.
How do I prepare cabinets for painting without sanding?
Begin by removing all hardware, then clean the surfaces thoroughly with a degreaser. After that, use a liquid deglosser to dull shiny finishes and help the paint adhere better. Ensure your workspace is protected with drop cloths, and label hardware for reassembly.
What type of paint should I use for cabinets?
Select a high-quality cabinet-specific paint with a satin or semi-gloss finish. These types of paint offer durability and are easier to clean, making them ideal for kitchen environments.
Experience a Flawless Cabinet Upgrade Without the Stress
Are you feeling uncertain about tackling a DIY cabinet update and worried that even with bonding primers and deglossers, your results might not last? If you loved the idea of a clean, dust-free kitchen transformation but want absolute confidence in quality, you are not alone. Many homeowners want a stylish kitchen facelift that feels professional, not temporary. With Ottawa Cabinet Painting, you get the smooth durability you crave—without household chaos, messy sanding, or the high costs of full replacement. We perfect every surface with meticulous prep and premium products, delivering a silky finish that stands the test of time. Plus, our detailed process helps you avoid common pitfalls of rushed DIY attempts, ensuring your kitchen truly becomes the heart of your home.
Why settle for less when you can have a warm, functional kitchen that looks brand new? Discover why local homeowners trust our team for cost-effective results and a six-year warranty. See our proven process and request your free quote today at our main site. Your dream kitchen is only a click away—make this the moment you upgrade with confidence.
Recommended
Comments